Originally, when I was looking at this problem last night, I was thinking it was going to be a decent challenge (I must’ve been fried!). Today, it is far less of a challenge and honestly, only took a few minutes to achieve. So, I may jazz it up a little bit to make it more pretty and with more functionality. Edit: Apologies for the length of this article, it turned into a doozie.
Reverse a Given String – Basics
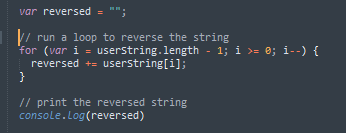
As I was saying, the basics really just turned into solving the whole function. You want to start of by assigning a variable a string. In this case I used: var hello = “hello”. Just to make sure I console.log’d this variable. Then you create a variable with an empty string to represent what the reversed value of this string. In my case, I went with: var reversed = “”; (I didn’t need to console.log this time 😛 ). So now you should have two variables.
The next thing to do is to use a descending for loop to target each letter of the string, count backwards through the letters of the string, and concatenate them to the new string. Sounds easy, right? My loop looks like this:
for (var i = hello.length – 1; i >= 0; i — ) {
reversed += hello[i];
}
Got it? Let me break it down for you. We’re using a for loop so it will continuously run through our task until completion. The first part of the loop is probably the trickiest: var i = hello.length – 1. Here we’re defining a variable, in this case i and are setting it to the length of our hello variable minus 1. Why minus 1, you ask? Well, this ties into the string of code we’re performing within the loop. In the rules of an array (hello is basically just an array of letters), the positions start at 0 and go up until n. Where n is the length of the array or string minus 1. So, “hello” would have an array length of 4 (0 = h, 1 = e, 2 = l, 3 = l, 4 = o). This idea starts to make sense the more you use it.
The next parts of the string are i >= 0 and i–. Again, with the example from the last paragraph, we’re using i >= 0, because we want the string to keep counting while it’s greater than 0 until it reaches 0. The last part, i– is simply a shorthand way to write i = i – 1. We use this to count the variable i down to 0.
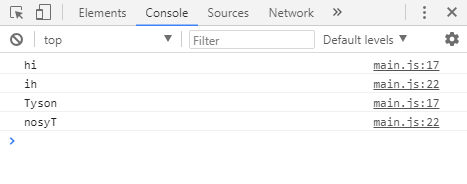
Lastly, the computation to reverse the string, which you’ll see it really easy. We’re taking our empty string variable reversed and are concatenating the string together backwards. The computation += is shorthand for reversed = reversed + whatever. In this case we’re adding to it the value of the hello variable at i. Remember, since i is counting backwards and starts from the end of the word, it will just keep adding letters to the string until complete. I then console.log(reversed) after the function to see our process has worked.
Taking a User Input
I want to start off this section by saying I’ve found something about Chrome of which I’m not fond. Apparently, if you make an input for a submit button with type equal to submit (and not button), then clicking that button will refresh your page. This will cause you, or it caused me- at least, a lot of extra time figuring out why you’re not able to get your code from a simple input within a form. So, when making your form with inputs and buttons and whatnot… make sure your button’s type is equal to button.
With that said, let’s get onto the code. First, you want to throw a simple form together in your HTML. We only really need one input with the value of text for the user to input their string and then another *with the value of button* for the submit button (you can also just use a button here). Styling right now isn’t so important. I usually try to make it functional before styling it, but if that’s how you work, that’s fine, too.
We’re going to want to create an empty string variable for the user’s input. I went with var userString = “”; . To define this, we will attach it to the input element within our HTML. The only problem with doing that now, is the value of the string at the time of the page loading is undefined. It’s literally just a blank input box and nothing happens when you click the button.
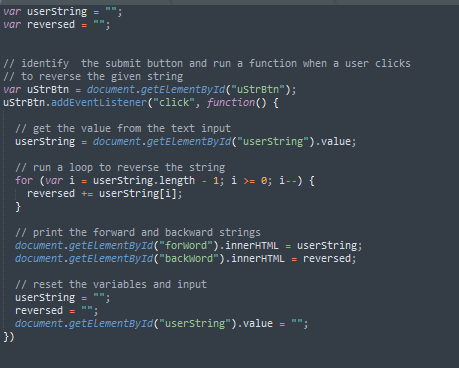
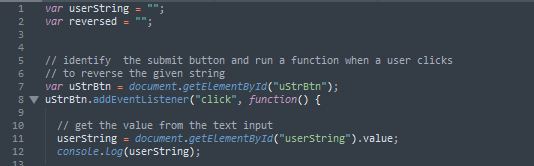
To get all this connected, you have to set up an event listener to your button so that when it is clicked, it knows to get the value of the string input. You also have to define a variable for your button to attach the HTML element. In the image below we define our user’s string input button variable (uStrBtn) and set it equal to that value of the HTML button. The we add an event listener to it to listen for a “click” and then fire a function to get the value of the input. We then set our userString variable to to the value within the input box (I console.log here to make sure it’s doing what I’m expecting it to do).
Tying It Together
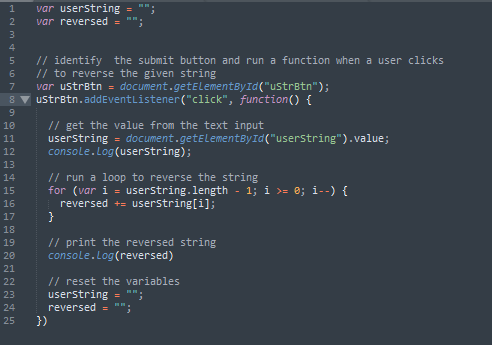
This should be a short section because all we’re doing is tying the two previous sections together. We want to take our loop from the first section and put it within our event listener on our button and after the current code. This will make sure it doesn’t run until after the button has been clicked and the string has been stored. At the very end of this loop, you’ll want to reset your variables to empty strings because otherwise, the variables will start to stack up and soon it’ll get out of hand.
Making It Pretty
At this point, your code has all the functionality, but who would know? It all prints to the console and unless you’re knowledgeable in the ways of development, no one is going to see it. So, let’s add some markup and make it pretty!
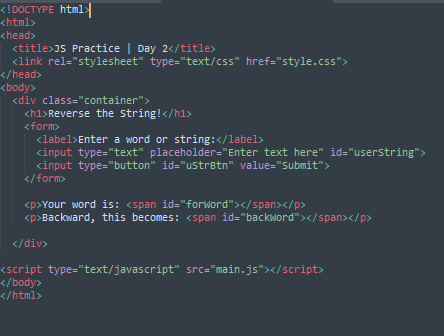
Fair warning: Mine isn’t super pretty. It’s going to be quick-pretty. Here’s what I have.
Final Touches
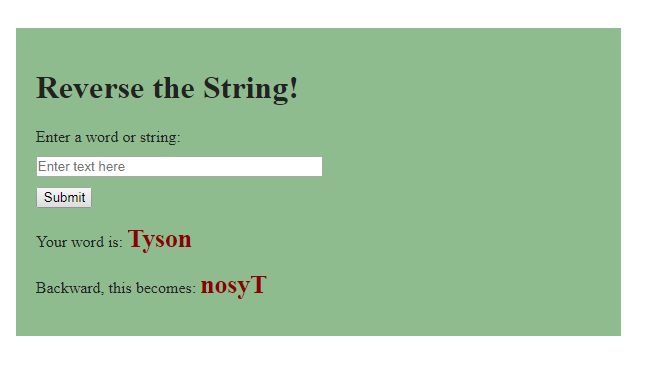
Yes, even after styling it up, there are a coupla extra steps. We want to display the word or display it backwards at the very least (I did both). So, before clearing your variables, you want to use your JS to change some of your HTML elements to display the values for your user’s input and backwards version. You’ll see below how I went about this. Also, I personally like the look of clearing the input after the button press, so under the variable reset button, I also added code to reset the value of the input.